ثبّت Simbye eSIM الخاصة بك
دليل خطوة بخطوة لأجهزة iPhone وAndroid • الإعداد في أقل من دقيقتين

افتح الإعدادات والخدمة الخلوية
- انتقل إلى تطبيق الإعدادات على iPhone الخاص بك
- مرر لأسفل وانقر على "الخلوي"
- سترى SIM الأساسية الخاصة بك مع رقم هاتفك
ملاحظة
تأكد من أن iPhone الخاص بك يعمل بنظام iOS 12.1 أو أحدث لدعم eSIM

تكوين البيانات الخلوية
- انقر على "البيانات الخلوية" في أعلى الشاشة
- حدد Simbye eSIM الخاصة بك (مدرجة عادةً أسفل SIM الأساسية)
- قم بتمكين "تشغيل هذا الخط" إذا لم يكن نشطاً بالفعل
نصيحة
يمكنك استخدام كلا SIM في وقت واحد - الأساسية للمكالمات، eSIM للبيانات

تمكين تجوال البيانات
- انقر على Simbye eSIM الخاصة بك في القائمة
- قم بتبديل "تجوال البيانات" إلى تشغيل (أخضر)
- eSIM الخاصة بك جاهزة الآن للاستخدام!
مهم
يجب أن يكون تجوال البيانات قيد التشغيل لكي تعمل eSIM في الخارج. لا رسوم إضافية مع Simbye!

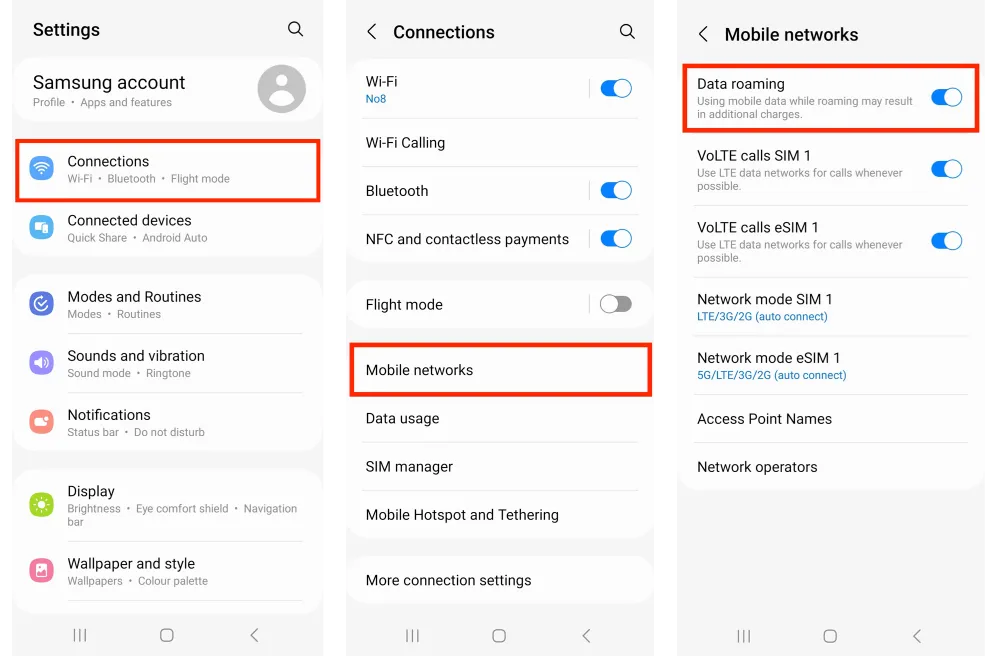
افتح الإعدادات والاتصالات
- انتقل إلى تطبيق الإعدادات على جهاز Android الخاص بك
- مرر لأسفل وانقر على "الاتصالات"
- حدد "إدارة بطاقة SIM" من القائمة
التوافق
يعمل مع Samsung Galaxy S20+، Google Pixel 3+ وأجهزة eSIM الأخرى

أضف eSIM الخاصة بك
- في "إدارة بطاقة SIM"، انقر على "إضافة خطة متنقلة"
- حدد "مسح رمز QR للمشغل"
- امسح رمز Simbye QR من بريدك الإلكتروني
بديل
يمكنك أيضاً إدخال رمز التفعيل يدوياً إذا فشل مسح QR

تأكيد التثبيت
- راجع تفاصيل المشغل على الشاشة
- انقر على "تأكيد" للمتابعة مع التثبيت
- انتظر التفعيل (يستغرق عادةً 10-30 ثانية)
الشبكة
تتعاون Simbye مع مشغلين محليين مميزين لأفضل تغطية

ضع اسماً لـ eSIM الخاصة بك
- اختر اسماً للتعرف السهل
- نوصي بـ "Simbye" أو "بيانات السفر"
- انقر على "تم" لحفظ الاسم
المنظمة
الأسماء الجيدة تساعد عند إدارة عدة eSIMs لبلدان مختلفة

تكوين إعدادات البيانات
- ارجع إلى "إدارة بطاقة SIM"
- اضبط Simbye eSIM كمفضلة لـ "البيانات المتنقلة"
- قم بتمكين "تجوال البيانات" لـ eSIM
- قم بتعطيل "السماح بتبديل البيانات" لتجنب الرسوم
مهم
احتفظ بـ SIM الأساسية نشطة للمكالمات/الرسائل النصية، استخدم eSIM للبيانات فقط
هل eSIM مثبتة بالفعل؟
إذا رأيت رسالة خطأ أثناء التفعيل، فقد تكون eSIM مثبتة بالفعل. اتبع هذه الخطوات للعثور عليها.
رسالة الخطأ
لا يمكن تفعيل eSIM. يرجى المحاولة مرة أخرى أو الاتصال بمزود الخدمة للحصول على المساعدة.
ماذا يعني هذا
تعني رسالة الخطأ هذه أن eSIM مثبتة بالفعل على هاتفك الذكي! تحقق من ذلك بمقارنة رقم ICCID من بريد التأكيد الإلكتروني أو في تطبيق Simbye تحت تفاصيل eSIM. اتبع الخطوات أدناه للعثور على eSIM المثبتة.

افتح الإعدادات
- افتح تطبيق <strong>الإعدادات</strong> على جهاز iPhone
- مرر للأسفل واضغط على <strong>عام</strong>

اضغط على حول
- في إعدادات عام، اضغط على <strong>حول</strong>
- هنا سترى معلومات عن جهازك وبطاقات SIM

ابحث عن ICCID
- مرر للأسفل للعثور على رقم <strong>ICCID</strong>
- قارن هذا الرقم مع ICCID في بريدك الإلكتروني أو تطبيق Simbye
- إذا تطابقا، فإن eSIM مثبتة بالفعل!
اسم الملف الشخصي
فوق ICCID سترى اسم ملف eSIM (مثل: سفر، عمل، أو اسم مخصص). تذكر هذا الاسم للخطوة التالية!

ابحث عن eSIM في إعدادات الخلوي
- اذهب إلى <strong>الإعدادات</strong> ثم <strong>خدمة الخلوي</strong>
- مرر للأسفل إلى قسم <strong>شرائح SIM</strong>
- ابحث عن اسم ملف eSIM (من الخطوة 3)
- اضغط على eSIM لتكوينها
- تأكد من تفعيل <strong>تشغيل هذا الخط</strong>
جاهز للاستخدام
بمجرد العثور على eSIM، قم بتفعيلها وتشغيل تجوال البيانات. eSIM من Simbye مثبتة بالفعل وجاهزة للاتصال!
