


How to install and activate your eSIM on Iphone?

1
Open Settings on Your iPhone
- Navigate to Settings on your iPhone and tap on "Cellular" or "Mobile Data".
- Select "Add eSIM" and then choose "Use QR Code".
- Scan the eSIM QR code from the printed code or another device displaying the code.
Note: For iPhones running iOS 17.4 or later, you can long-press a QR code received via email or on a webpage and select "Add eSIM" directly.

2
Tap "Continue"
- Tap "Continue" and wait up to 10 minutes for the eSIM to activate.
- Once activated, tap "Done".

3
Label Your eSIM on iPhone
- You can rename your eSIM for easier identification.
- Tap the > icon and select a preset label or enter "Simbye" in the Custom Label field.
- After labeling, tap "Done" and then "Continue".

4
Set Your Default Line
- Set the Default Line to "Primary" and tap "Continue".
- Ensure iMessage & FaceTime are also set to "Primary" and tap "Continue".
- For Mobile Data, select the previously chosen eSIM label.
Important: Keep "Allow Mobile Data Switching" turned off to avoid extra roaming charges.
It’s best to activate your eSIM only at your destination to prevent any data usage before your trip.
It’s best to activate your eSIM only at your destination to prevent any data usage before your trip.

5
Activate Your eSIM
- After installation, go back to Settings.
- Navigate to "Mobile Service".
- Select your eSIM from the list.
- Turn the line "On".
- Set "Data Roaming" to "Online".
Important: Perform this step only when you have arrived at your destination country to ensure optimal connectivity and avoid unnecessary roaming charges.
How to install and activate your eSIM on Samsung?

1
Open Settings on Your Samsung Device
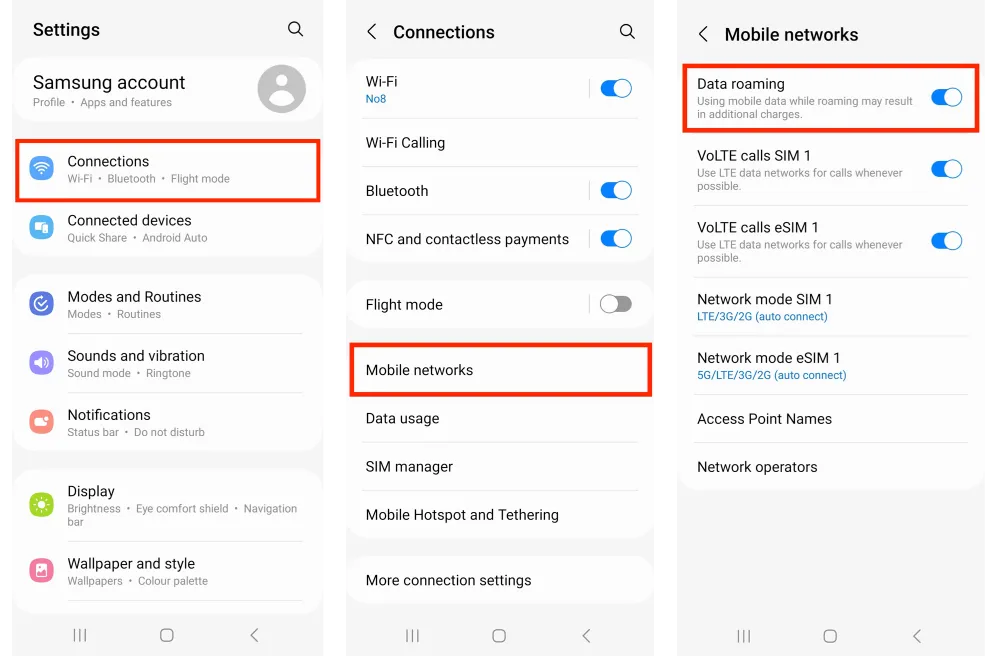
- Navigate to the "Settings" app on your Samsung smartphone.
- Scroll down and tap on "Connections".
- Select "SIM card manager" from the list.
Note: Ensure your device is running the latest software version for optimal performance.

2
Add eSIM
- In the "SIM card manager", tap on "Add mobile plan".
- Select "Download a SIM instead" to use a QR code.
- Scan the eSIM QR code provided by your carrier using your device's camera.

3
Confirm Your eSIM Details
- Review the carrier details displayed on the screen.
- Tap "Confirm" to proceed with the installation.
- Wait for your device to activate the eSIM, which may take a few minutes.
Tip: Ensure you have a stable internet connection during the activation process.

4
Label Your eSIM
- After activation, you'll be prompted to label your eSIM.
- Select a preset label or enter a custom name like "Simbye" for easy identification.
- Tap "Done" to save the label.
5
Set Your Default Line
- Go back to "SIM card manager" in Settings.
- Select your newly added eSIM and set it as the default for calls, messages, and data.
- Ensure that "Data Roaming" is set to "Online" to enable internet access.
Important: Disable "Mobile Data Switching" to prevent unexpected roaming charges.
How Much Mobile Data Do You Need?
Data Usage Calculator
Calculate how much data you'll need based on your daily activities and travel duration.
hours/day
hours/day
hours/day
hours/day
hours/day
hours/day
hours/day
hours/day
Is my device compatible with a Simbye eSIM?
To check if your device is compatible with a Simbye eSIM, visit our comprehensive guide here: eSIM Compatible Devices .