Install Your Simbye eSIM
Step-by-step guide for iPhone and Android devices • Setup in under 2 minutes

Open Settings & Mobile Service
- Navigate to the Settings app on your iPhone
- Scroll down and tap on "Mobile Service"
- You'll see your primary SIM with your phone number
Note
Ensure your iPhone is running iOS 12.1 or later for eSIM support

Configure Mobile Data
- Tap on "Mobile Data" at the top of the screen
- Select your Simbye eSIM (usually listed below your primary SIM)
- Enable "Turn On This Line" if not already active
Tip
You can use both SIMs simultaneously - primary for calls, eSIM for data

Enable Data Roaming
- Tap on your Simbye eSIM in the list
- Toggle "Data Roaming" to ON (green)
- Your eSIM is now ready to use!
Important
Data Roaming must be ON for the eSIM to work abroad. No extra charges with Simbye!

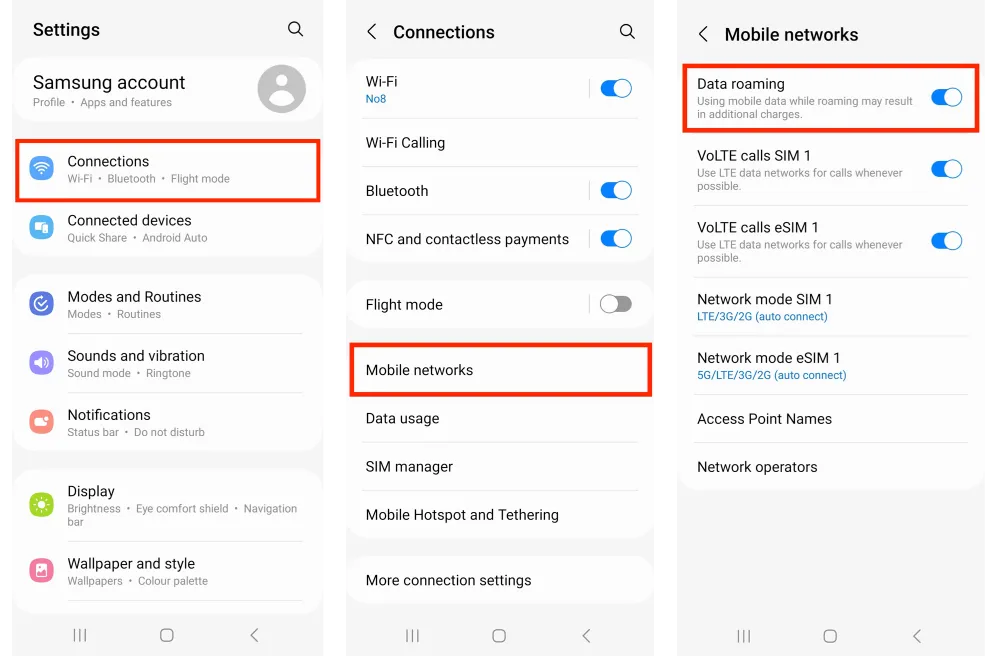
Open Settings & Connections
- Navigate to the Settings app on your Android device
- Scroll down and tap on "Connections"
- Select "SIM card manager" from the list
Compatibility
Works with Samsung Galaxy S20+, Google Pixel 3+, and other eSIM devices

Add Your eSIM
- In "SIM card manager", tap on "Add mobile plan"
- Select "Scan carrier QR code"
- Scan the Simbye QR code from your email
Alternative
You can also enter the activation code manually if QR scanning fails

Confirm Installation
- Review the carrier details on screen
- Tap "Confirm" to proceed with installation
- Wait for activation (usually takes 10-30 seconds)
Network
Simbye partners with premium local carriers for best coverage

Label Your eSIM
- Choose a label for easy identification
- We recommend "Simbye" or "Travel Data"
- Tap "Done" to save the label
Organization
Good labels help when managing multiple eSIMs for different countries

Configure Data Settings
- Return to "SIM card manager"
- Set Simbye eSIM as preferred for "Mobile data"
- Enable "Data roaming" for the eSIM
- Disable "Allow data switching" to avoid charges
Important
Keep your primary SIM active for calls/SMS, use eSIM for data only
eSIM Already Installed?
If you see an error message during activation, your eSIM might already be installed. Follow these steps to find it.
Error Message
The eSIM cannot be activated. Please try again or contact your mobile carrier for assistance.
What this means
This error means your eSIM is already installed on your smartphone! Verify this by checking the ICCID number from your confirmation email or in the Simbye app under eSIM Details. Follow the steps below to find your installed eSIM.

Open Settings
- Open the <strong>Settings</strong> app on your iPhone
- Scroll down and tap on <strong>General</strong>

Tap on About
- In the General settings, tap on <strong>About</strong>
- This will show you information about your device and SIM cards

Find Your ICCID
- Scroll down to find the <strong>ICCID</strong> number
- Compare this number with the ICCID in your email or the Simbye app
- If they match, your eSIM is already installed!
Profile Name
Above the ICCID you will see the eSIM profile name (e.g., Travel, Business, or a custom name). Remember this name for the next step!

Find Your eSIM in Mobile Settings
- Go to <strong>Settings</strong> and then <strong>Mobile Service</strong>
- Scroll down to the <strong>SIMs</strong> section
- Look for your eSIM profile name (from Step 3)
- Tap on your eSIM to configure it
- Make sure <strong>Turn On This Line</strong> is enabled
Ready to Use
Once you find your eSIM, simply enable it and turn on Data Roaming. Your Simbye eSIM is already installed and ready to connect!
